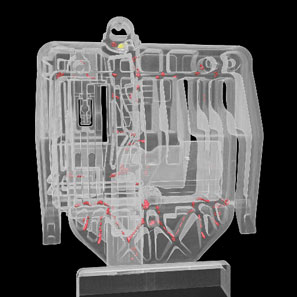
Exact Metrology offers many of the CT scanning technology and services you need for a variety of industries. Part of what we offer includes education on 3D technologies and their operations. As such, to improve your understanding, we have put together some information on how an industrial CT scan actually works.
The Basic Process
First, let’s cover the basic parts of an industrial CT or X-ray scanner. The essential components are an image receptor, a detector, a negatively charged electrode, and electricity. The electricity, when applied to the negatively charged electrode, releases electrons that serve as energy that starts the entire process by directing those electrons toward the source object at an accelerated speed. The X-ray itself is created through these steps. Then, the X-ray passes through the object, and the image receptor plate (like an old-fashioned camera) makes a record of the X-ray’s strength.
The X-ray is represented on a light spectrum, from light to dark. The lighter portions, which appear as shadows, represent denser materials. And the darker portions represent softer materials that are more easily penetrated by the X-ray. The visual of light and dark contrast is what many of you may be familiar with from classic medical X-rays.
How Industrial CT Scanning Uses X-Ray Technology
In addition to the process and traditional X-ray described above, an industrial CT scan adds a third component, or an additional dimension, to the light and dark contrast in the form of a CNC-controlled turntable. This turntable rotates the source object as it is repeatedly X-rayed. The number of X-ray images captured is significantly greater than that of traditional medical X-ray technology. Whereas your dentist might produce 5-6 image captures of your mouth, an industrial CT scanner produces thousands of images of the object it is capturing.
The Role Of Software
Once the images are captured, we turn to software to process the imaging data. First, the software works to compile the series of grayscale images and uses them to construct a composite image. The 3D software compares the pixels that share a color and relative position in order to determine relative coordinate positioning. The pixel that is then constructed from these data points is called a “voxel” which becomes a component of the stack of grayscale cubes that create the final 3D construction.
Ultimately, the software must undertake the daunting work of evaluating the voxels’ color, making choices about how to bring them together in 3D space, and creating a “skin” of the voxels that will serve to represent the source object that has been scanned.
The ability to compare the contrast in the voxel allows for better determination of an object’s boundaries and edges, which can be used to pinpoint foreign contamination and voids deep within the object. This ability can also be used to digitally separate complex assemblies of various materials, such as metals and plastics, used to construct an object. Because different materials have different densities, the X-ray passes through them at different rates of penetration and 3D software is able to easily distinguish them, thereby allowing for further analysis of individual components.
See What Exact Metrology Has To Offer
Exact Metrology are your CT scanning experts, supplying all necessary CT technology and services to get the job done right and at the highest level of quality. You can purchase CT scanning equipment through us, along with expert introductory training and additional educational courses for all personnel who will be using the technology. We also offer industrial CT scan services, taking the set-up and work out of your hands and providing you with the deliverables you want most. For a better idea of the wide-ranging applications of 3D scanning, read about the use of CT scanning for inspection purposes.


