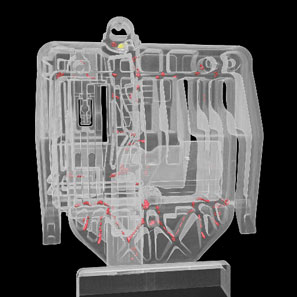
3D Image-Based Defect Analysis
CT makes it possible for a test sample to be represented as a 3 dimensional object with all internal information included—enabling precise analysis of the position, size and frequency of defects.

Dimensional Measurement

The volumetric data acquired contains geometric information for the entire specimen—perfect for performing dimensional inspection of component structures not visible from the outside or difficult to access.
Nominal/Actual Comparison

CT technology can be used to capture internal component structures and generate Voxel surface data from them—allowing comparison with the original CAD data from the component.
Reverse Engineering

CT data can be used for the non-destructive recovery of component geometry data—with dedicated software then being used to reimport the surface generated back into a CAD model.
X-ray Inspection

Industrial X-Ray Example

X-ray inspection or industrial imaging systems are quickly emerging as an essential tool in testing applications; an integral part of quality control due to their ability to non-intrusively detect defects, inconsistencies and contaminants in products.
An Inside Look
We recently completed a CT Scanning project involving an aluminum casting measuring approximately 12” x 6” x 6” and weighing 10 to 15 pounds. For this particular job, the client was interested in wall thickness inspection as well as porosity and void analysis.
The blue paint you’ll see in one of the images here was applied by the customer to indicate stress areas where leaking or breaking was suspected. Our scans [we did three, each taking only about one half hour] show the voids [legitimate holes] and highlight the most serious problem areas in red-to-pink shades in the accompanying image below.

The work piece [casting] was rotated 360 degrees in the x-ray beam’s path with multiple readings from various angles being taken. Once the CT grey scale images were converted into voxel-based 3D point clouds we were able to generate a CAD-to-Part comparison for the customer.


